One thing that I have noticed with Ziggy is the difference the 2.8 JTD engine makes - its less frenetic with gear changes than the old normally aspirated 2.5 engine that was up and down the gearbox in hilly territory like a bride's nightie.
But, the engine is a tad thirstier - not by much but..... So I started looking and thinking about getting the engine mapped fully - something that I have done to good effect on my Aprilia 1000 in the past.
I started looking closely into it, and discovered plug in box made by BlueSpark - https://bluesparkautomotive.com/. I read further and ordered
There are, for my model of engine three choices. Please note that you need to be very specific with regards to the engine - there are multiple variants of the same thing so 2.8JTD is not enough. Look on the VIN plate at the front of the engine bay:
Note the line that states MOTORE - 8140.43s - that's the information that tells me that it was indeed one of the first JTD engines so a Bluespark could be fitted.
The Bluespark website made it easy to track down to get to the correct product, and then there was a choice of 3 different types of chip - the most expensive solution also being a twin channel unit that could control fuelling - this giving up to 15% improved mpg. The cheapest unit mainly improved torque and power. The mid range unit stated that the power would improve from 94 to 115 kilowatts (128 to 157PS). It also stated that there would be a 10% mpg increase. I do appreciate that these figures are ball park figures as the engines do vary! The upper and mid range units are both fitted with 5 user selectable maps, with 10 levels of adjustment per map. The base unit only has 5 selectable maps.
All three units are available with a Bluetooth command module for an extra £50.
I don't want to do an actual price as- being tight - I looked on EvilBay and found that the company themselves sell them there for a reduced tariff / discount - I paid £179 +£50 for bluetooth.
The box arrived and was complete with very detailed instructions - there was also a video on the website that I found useful. The main thing I noticed was the specific detail of which way round the main connection pug was fitted - READ IT!!!
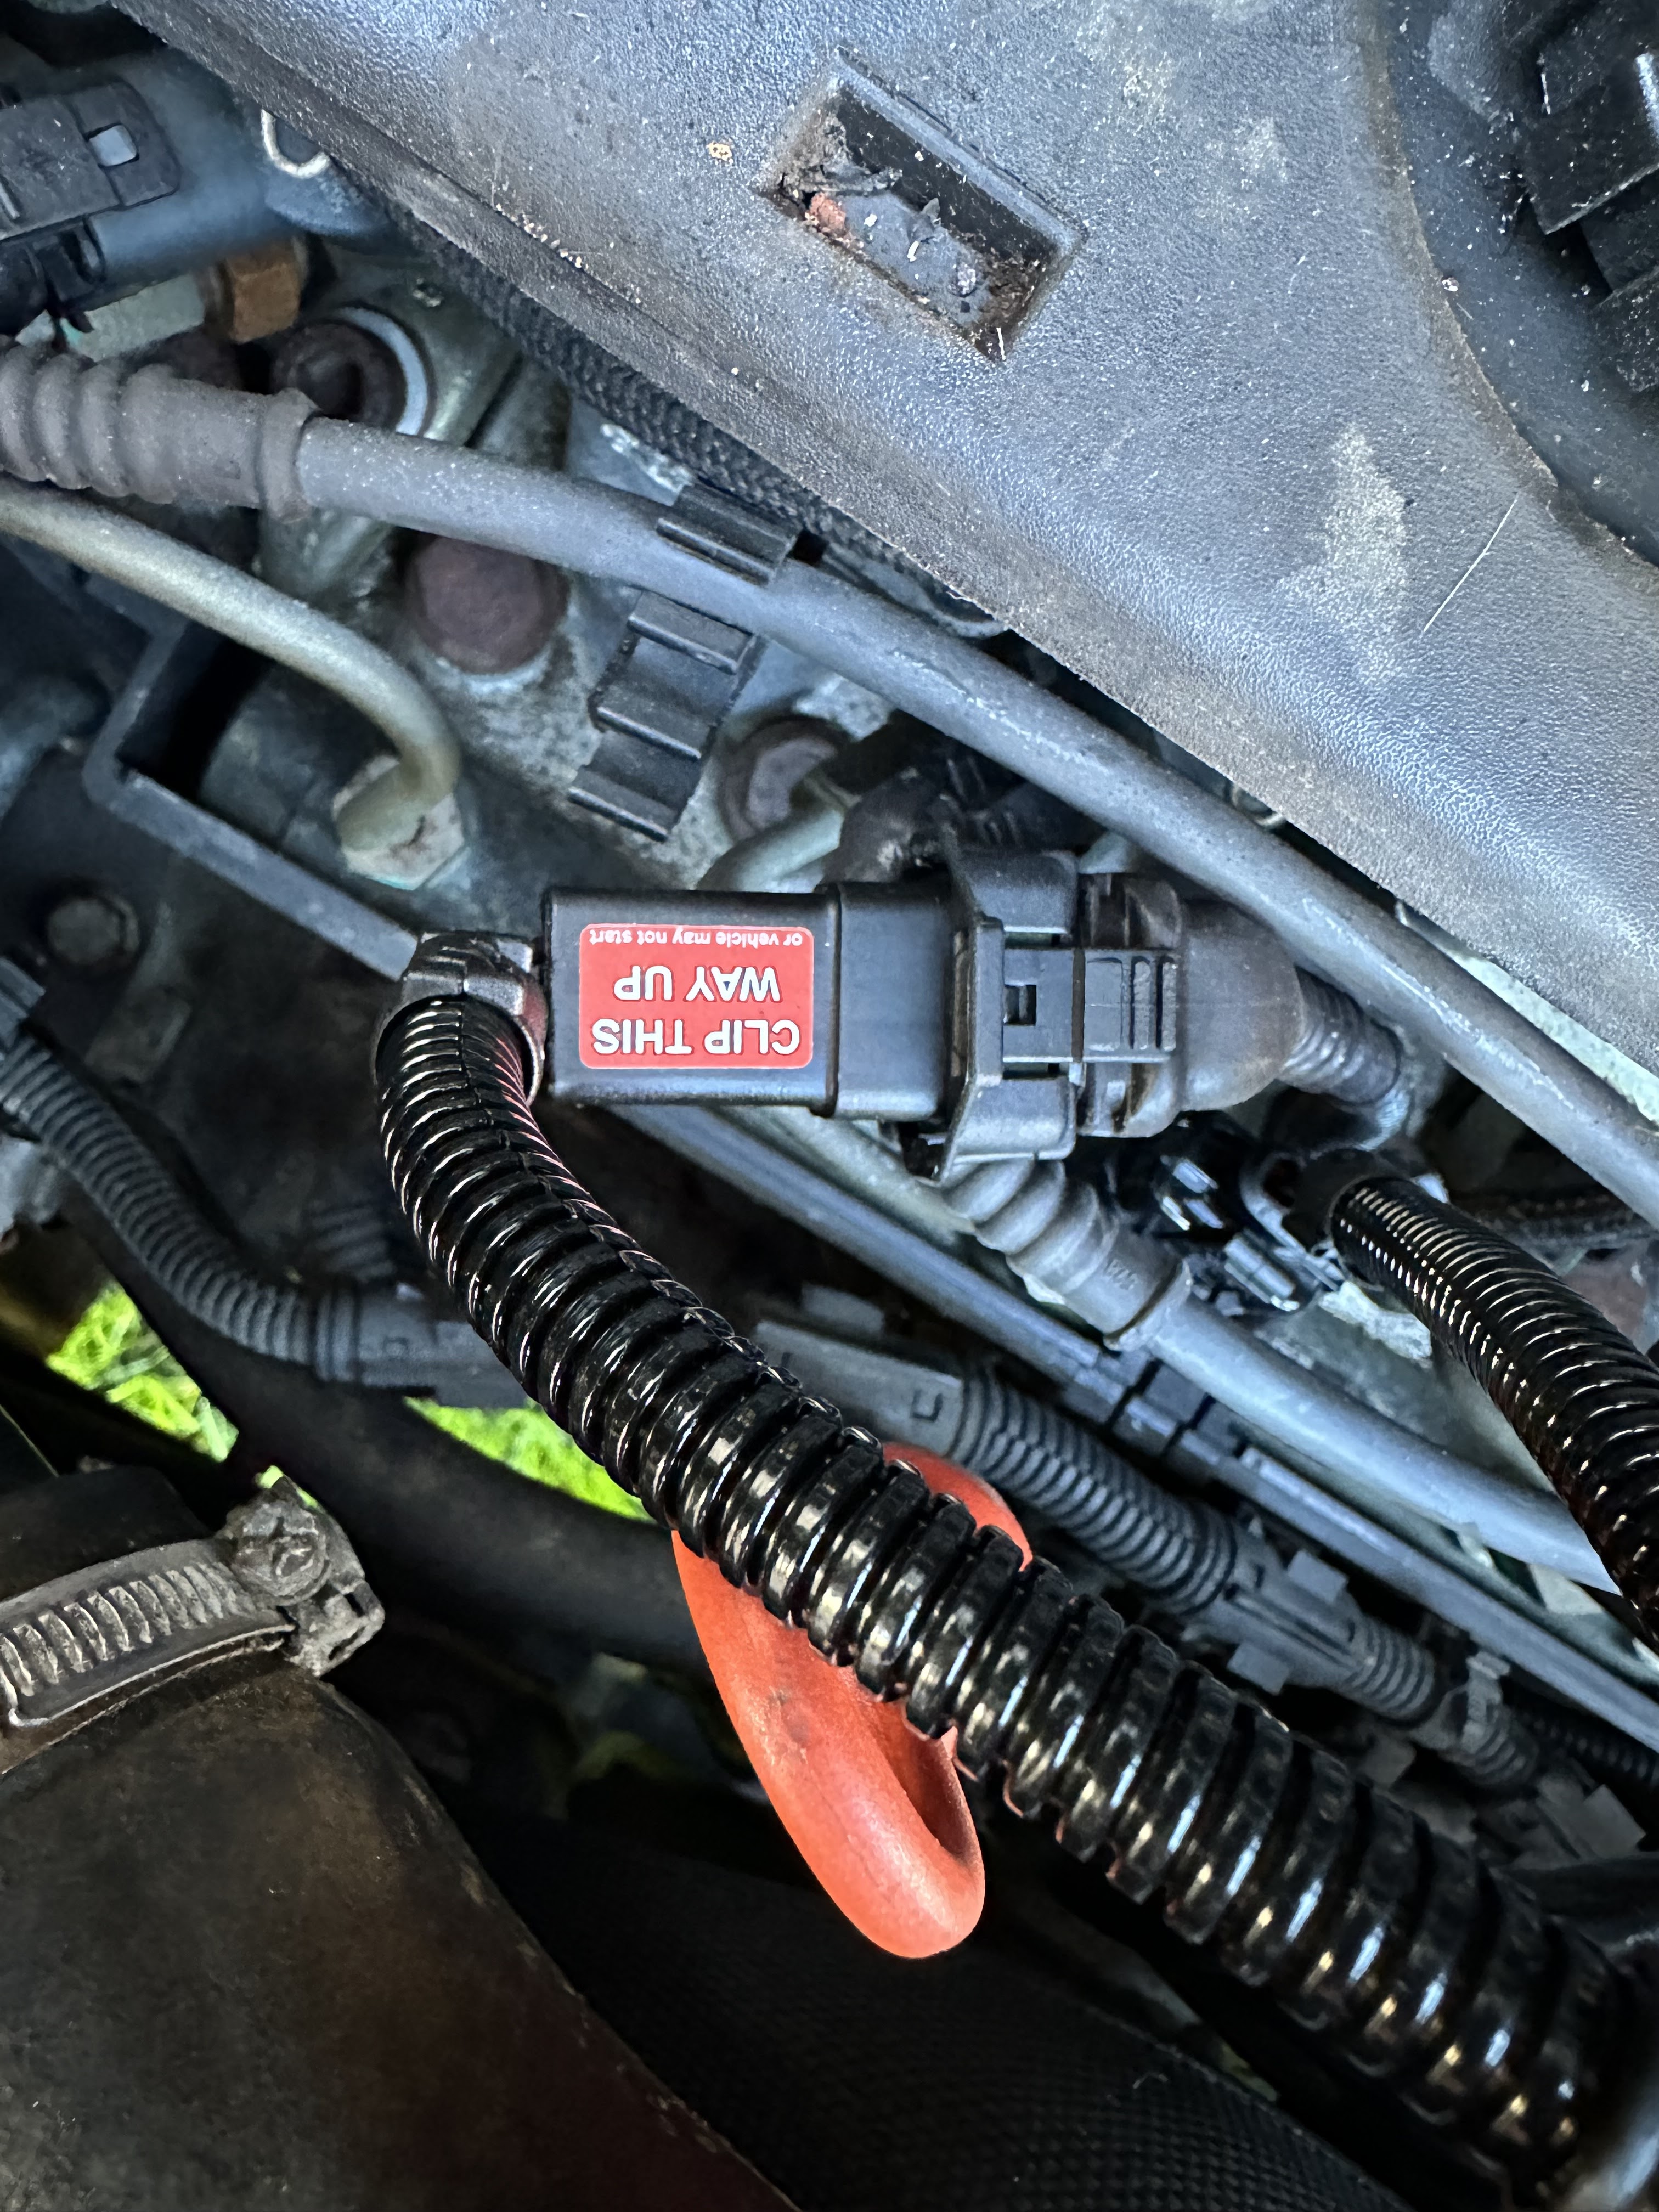
Having digested the information, and ably assisted by Number 1 son, we set to work on the engine bay to envisage all that we needed to The engine top cover was held on by two plastic nuts - one had been mullered by some gorilla previously but no matter. Once that was removed we could see the injection rail, and having checked in multiple forums identified the main plug - pleased note that as detailed above, the generic engines do have differences!
In this image the correct plug to remove is to the right of the Red Oil Dipstick and it is the black shiny lead.
Once disconnected, the Y lead for the BlueSpark was connected, and then the main plug was added to the Y plug as well - the respective leads looked at and routed so they could be fed under the engine cover when fitted and ensuring that leads were well secured:
The box itself then needed to be mounted somewhere that was not going to move, and would not vibrate too much - the kit did come with some cable ties. In the short term as I do not like cable tying alloy casings direct to metal, I used a piece of polystyrene as a buffer - once secure, and having checked through the install directions, we started the engine up and saw the Bluelight lit.
I then set up the app on my phone, paired via bluetooth and at down to play - but a couple of things to note, that the system did not just work - I was foxed initially by a message on the app that told me that the warm up process was running for 0 seconds , and when I went to change a map I got the following idiot screen on the app on my iPhone:
Somewhat confused and bewildered by this, I reached out to BlueSpark's tech support team and got a very reassuring message back:
Sorry to hear you are having issues with the app.
This issue generally means that your engine idles at a slightly different voltage,
This can be resolved with an updated map file.
To reprogram the unit, please read the attached guide and use the code "..........*" when prompted (uppercase letters removed).
Once you have completed the reprogramming, please switch the car off, lock it and wait a full 10 mins. This allows the system to fully power down and restart.
When you go back to it, map switching should be enabled.
Sorry for the inconvenience, if you need any further assistance, please feel free to ask.
That sorted it - and he also kindly explained what the different maps etc equate to:
The unit offers different mapping profiles rather than A is low and E is high tune. There are 5 different maps as well as a fine tune controller.
The fine tune Dip Switch (1-9 numbered dial) acts as a gain control for the box. This is effectively like a volume control: it makes the whole map's increase higher or lower, in the same way that a volume control makes a whole song louder or quieter. The "quiet" bits will still be "quiet", the "loud" bits will still be comparatively "loud", but the whole thing will be raised up or lowered down depending on the setting.
The map settings (A-E Red Jumper) are more like changing the song. Each map is fundamentally different and has gains at different points in the rev range.
On your engine they could be described like this:
Map A - Mild map mostly biased for fuel economy. The gains are mostly below 3000RPM.
Map B - Moderate map biased for a mixture of fuel economy and torque. The gains are mostly below 3500RPM.
Map C - All round improvement map with good, smooth improvements in just about everything. Gains are right the way through the rev range with no particular bias for any point.
Map D - Big torque gains providing maximum acceleration, this map provides maximum gains across the low-mid rev range and also provides high levels of tune at higher rpm.
Map E - Focus on top end tune with moderate tune up to around 3000RPM, then a higher top end level of tune compared to the other maps.
The best way to evaluate them is to test them for yourself, if you find that you like a particular map, it is probably best to tweak the numbered dial to find the setting on that map that works for you.
I hope this makes sense, I realise its an odd explanation but it's one that resonates well with most people.
Regards
Gary
Bluespark Automotive Ltd.
0191 385 9005
So - all fitted, and I am looking forward to getting some data from the road to see what difference it makes. I will I suspect be using the C map - but it may well be that as and when I am playing in a hilly area, I will move to a D map to gain a bit of oomph.
I will come back and update this blog in the future with regards to performance but, I think the this is something for all to consider - I would say that with correct planning, and reading the instructions carefully, this is a relatively simple installation for an amateur to do.
18/04/2024 - UPDATE
following our trip to Belgium where we covered 613 miles, some thoughts and observations.
The extra power is a marked improvement - on the smooth French roads we sat very nicely at 65mph. On the C6 map, the mpg was, roughly speaking the same.
For the return leg from Dover to home - a tad over 120 miles, I switched to using B6 map - this still gave more grunt - but not quite as much as the C map - the MPG did increase slightly however.
so - definitely worth while fitting


Comments
Post a Comment